
A loose kitchen faucet can be frustrating and lead to water leaks if not addressed promptly. Knowing how to fix a loose kitchen faucet is crucial for maintaining a functional and efficient kitchen environment. By following our step-by-step instructions, you can regain stability in your faucet, preventing potential plumbing issues down the line. With the right tools and a basic understanding, this task is manageable for homeowners of all skill levels, saving you time and money on professional repairs. Master this simple maintenance task and ensure your kitchen faucet remains sturdy and leak-free for years to come.
How Do I Know If My Kitchen Faucet Is Loose?

To confirm if your kitchen faucet is indeed loose, you can try tightening the mounting nut underneath the sink using a wrench. If this does not resolve the issue and the faucet continues to move, it may be necessary to call a professional plumber for further inspection and repairs. Ignoring a loose faucet can lead to more significant problems down the line, so it’s essential to address it promptly.
Can I Use Regular Tools To Tighten My Kitchen Faucet?

It is not recommended to use regular tools to tighten your kitchen faucet, as this can potentially damage the fixture or cause leaks. Kitchen faucets typically require specific tools for proper installation and maintenance. Using the wrong tools can strip the screws or fittings, leading to further problems down the line.
Clear The Sink Area

To effectively fix a loose kitchen faucet, start by clearing the sink area of any items or clutter to provide ample space to work. This step ensures you have easy access to the faucet and reduces the risk of items getting in the way during repairs. Next, prepare a suitable work surface around the sink by placing a towel or mat to protect the area from scratches and to catch any dropped parts. This preparation not only keeps your workspace organized but also prevents damage to your kitchen counter or sink.
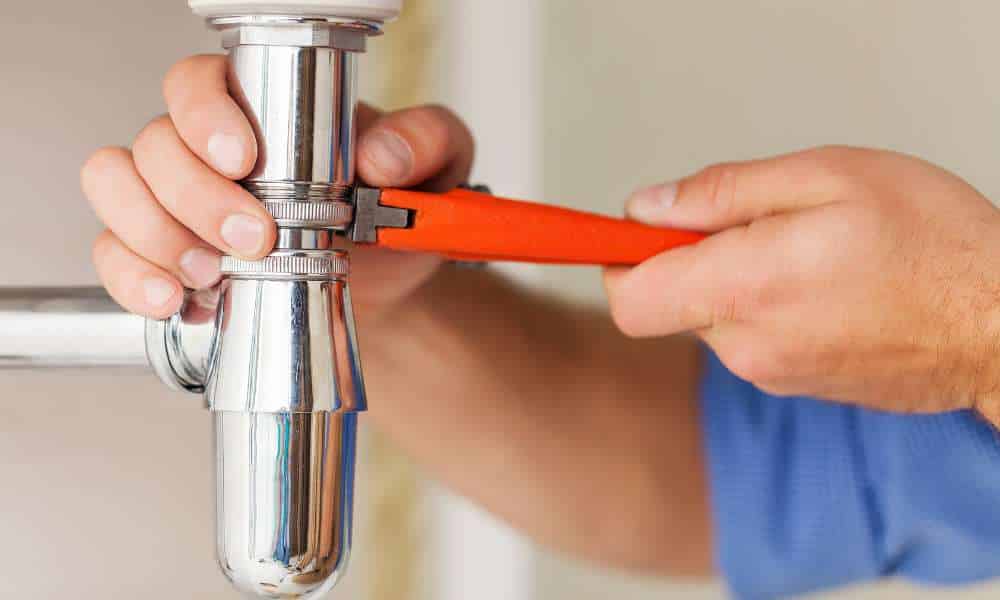
Tightening The Base Nut
Begin the repair process by focusing on tightening the base nut of the faucet underneath the sink. Use an appropriate wrench to secure the nut firmly against the underside of the sink. This action helps stabilize the faucet and prevents it from wobbling or moving unnecessarily. Ensure you tighten the base nut adequately, but be cautious not to over-tighten, which could potentially damage the faucet or sink material. Once tightened, test the faucet to check for stability and make any necessary adjustments to achieve a secure fit.
Preparation Steps
1. Shutting Off The Water Supply
Shutting off the water supply is essential to prevent any accidental leaks or water damage during the repair process. Locate the shut-off valves under the sink and turn them clockwise until they are tightly closed. This precaution ensures a safe environment to work in and minimizes the risk of water-related mishaps.
2. Emptying The Cabinet
Next, emptying the cabinet beneath the sink is recommended to create ample space and easy access to the faucet. Remove any stored items, cleaning supplies, or kitchenware that could obstruct your workspace. This step not only facilitates a clearer working area but also prevents potential damage to items from water or tools during the repair.
3. Ensuring Safety Measures
Ensuring safety measures throughout the repair process is equally important. Before proceeding, wear protective gloves to shield your hands from sharp edges or plumbing components. Additionally, using a flashlight can help illuminate the area under the sink, making it easier to identify and navigate around pipes and connections. Taking these precautionary steps ensures a smooth and safe repair experience while fixing a loose kitchen faucet.
Addressing Leaks Promptly
Addressing leaks promptly in your home can save you time and money in the long run. A common source of leaks is a malfunctioning single handle kitchen faucet, which can lead to wasted water and potential damage to your fixtures. When dealing with a leaky faucet, it’s important to first turn off the water supply to prevent further leakage.
Lubricating Moving Parts

Lubricating moving parts is another essential step in fixing a loose kitchen faucet. Over time, the internal components of the faucet can become worn or corroded, leading to stiffness or instability. Apply a silicone-based lubricant to the moving parts, such as the handle and the base of the faucet, to enhance their smooth operation. This simple maintenance step reduces friction, minimizes wear and tear, and extends the lifespan of your faucet. Regular lubrication ensures that your kitchen faucet remains easy to use and free from potential issues caused by dry or stuck components.
Accessing Underneath The Sink
Accessing underneath the sink is necessary for a thorough inspection and repair of a loose kitchen faucet. Use a flashlight to illuminate the area and locate the nuts and bolts securing the faucet to the countertop. Using an adjustable wrench, carefully tighten these fasteners to stabilize the faucet. Inspect the supply lines and connections for any signs of wear or damage, tightening them if necessary to prevent leaks. Accessing underneath the sink allows you to address the root cause of the faucet’s instability and ensure a secure and functional fixture in your kitchen.
The Final Thought
Fixing a loose kitchen faucet is a simple task that can be completed with just a few tools and some basic DIY skills. By following the steps outlined in this article, you can easily tighten your faucet and prevent any further damage or leaks. Remember to turn off the water supply before starting the repair process to avoid any accidents. Regularly checking and tightening your kitchen faucet will help maintain its functionality and prevent costly repairs in the future. Take action today and fix that loose kitchen faucet to ensure a smooth and efficient flow of water in your kitchen.