
Replacing the aerator on a kitchen faucet is a straightforward task that can enhance water flow and save you from unnecessary expenses. Understanding how to replace an aerator on a kitchen faucet ensures you can maintain optimal water pressure and efficiency effortlessly. By learning how to replace the aerator on your kitchen faucet, you can avoid potential plumbing issues and improve the overall functionality of your sink. This guide provides step-by-step instructions on the kitchen faucet, empowering you to tackle this task confidently and efficiently.
How Often Should I Replace My Aerator?

Regular maintenance of your aerator is important to prevent clogs and maintain efficient water flow. By keeping an eye on the condition of your filter and replacing it as needed, you can ensure that your faucet continues to function properly and conserve water. Remember that proper care and maintenance of your filter can help extend its lifespan and improve the overall efficiency of your plumbing system.
Can I Clean A Clogged Aerator Instead Of Replacing It?

Yes, you can try cleaning a clogged aerator before deciding to replace it. A clogged aerator is usually caused by mineral deposits or debris blocking the flow of water. To clean it, unscrew the filter from the spigot and soak it in vinegar for a few hours to dissolve the buildup. Use a small brush to gently scrub away any remaining debris. Once clean, reattach the filter to the spigot and test the water flow.
Preparation Before Starting
Before replacing the aerator on your kitchen spigot, it’s crucial to gather the necessary tools and materials. Typically, you’ll need an adjustable wrench, possibly some pliers, and a cloth to protect the faucet finish. Ensure the water supply to the faucet is turned off to prevent any leaks or spills during the process. Taking these preparatory steps will streamline the filter replacement and minimize the risk of damaging your spigot.
Different Faucet Designs
Kitchen faucets come in various designs, which can affect how you approach replacing the aerator. The most common types include standard faucets with screw-on aerators and more modern designs with hidden or recessed filters. For faucets with screw-on aerators, you can usually unscrew them by hand or with the help of pliers if they are stuck. On the other hand, faucets with hidden aerators may require a special tool or additional steps to access and replace the filter. Understanding your spigots design will ensure you proceed with the correct method for replacing the filter effectively.
Finding The Aerator Location
Finding the aerator location on your kitchen spigot may seem like a daunting task, but with a little bit of investigation, you can easily locate it. Start by examining the tip of your faucet where the water comes out – this is usually where the filter is located. If you can’t see it there, try unscrewing the spigot tip or spout to reveal the filter underneath. Another trick is to check underneath your sink for an access point to reach and remove the filter from below.
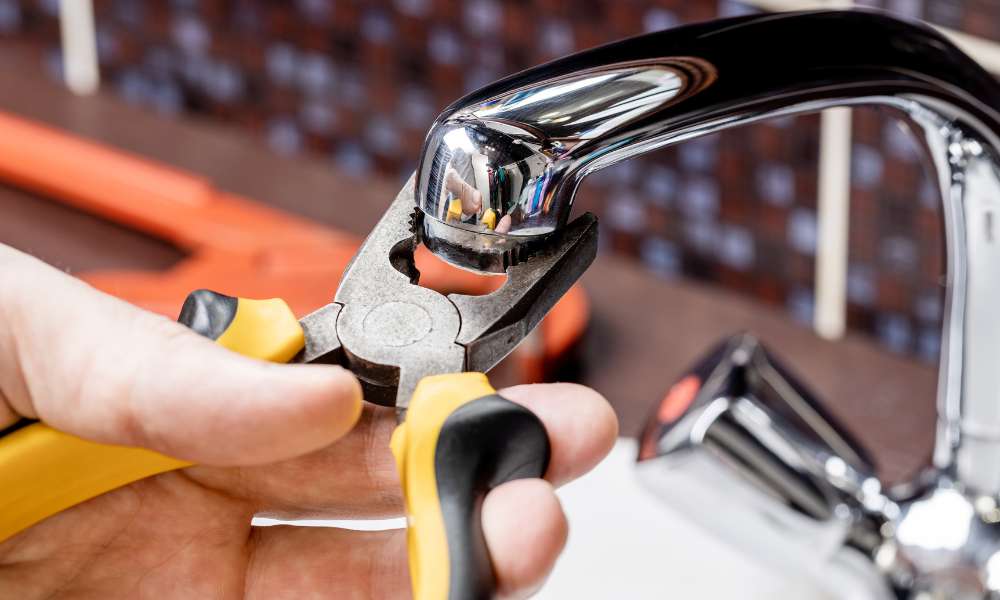
Dealing With Stuck Aerators
Dealing with stuck aerators on kitchen spigots can be a frustrating experience, but with the right tools and knowledge, it doesn’t have to be a daunting task. One effective method for removing a stuck aerator is to use a pair of pliers to grip the filter firmly and twist it counterclockwise until it loosens. If the filter is still stuck, try using a lubricant like WD-40 to help loosen it before attempting to remove it again.
Ensuring A Proper Fit
To replace your kitchen faucet, ensuring a proper fit is crucial for both functionality and aesthetics. Before purchasing a new spigot, take precise measurements of your sink to determine the right size and configuration. Keep in mind factors such as the number of mounting holes, spout height, and reach to ensure compatibility with your existing setup.
Turning On The Water
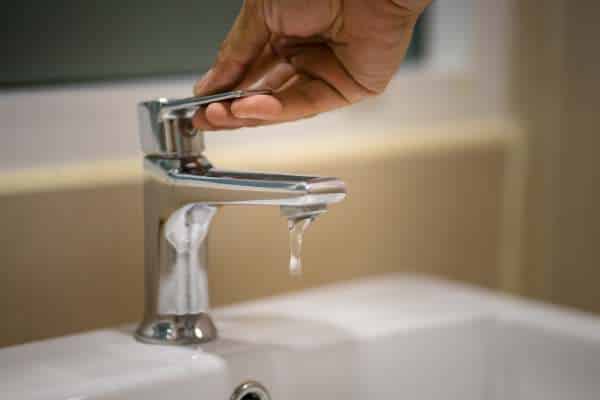
Once the old aerator is successfully removed, inspect the faucet spout for any debris or buildup that may hinder the installation of the new aerator. Clean the threads thoroughly with a cloth or a small brush to ensure a smooth surface for the replacement filter. Select a new aerator that matches the thread size and style of your spigot to ensure a proper fit and functionality. Carefully screw the new filter onto the spigot spout by hand, then use the adjustable wrench to tighten it securely without over-tightening.
Regular Cleaning Of Aerators

Regular cleaning of the aerator is also key to maintaining its efficiency over time. Sediment and mineral deposits can accumulate within the filter, causing reduced water pressure and flow. To clean, simply unscrew the filter periodically and soak it in vinegar overnight to dissolve any buildup. Rinse thoroughly with water before reattaching to the spigot. By incorporating these steps into your maintenance routine, you can prolong the lifespan of your kitchen faucet’s filter and ensure consistent water performance.
Improved Water Flow And Pressure
Remember that maintaining good water flow and pressure not only enhances your daily routines but also contributes to overall household efficiency. Taking proactive steps such as replacing the aerator on your kitchen spigot will not only improve performance but also extend the life of your plumbing system. By staying attentive to these details, you can ensure a smoothly running kitchen that meets all your needs effectively.
The Final Thought
To replace the aerator on your kitchen faucet is a simple and cost-effective way to improve water flow and save money on your water bill. By following the step-by-step instructions provided in this article, you can easily tackle this DIY project even if you have limited plumbing experience. Remember to gather all necessary tools and materials before starting and take your time to ensure a proper installation. With a new filter in place, you will enjoy a more efficient and environmentally friendly kitchen spigot. Take action today and upgrade your spigot with a new filter for better performance!